TUBLISS: FAQ, INFO & TIPS
FAQ
GENERAL FAQ
What’s included with the TUbliss KIT or SYSTEM?
The TUbliss itself, with rim tape, a plug in case you have an extra hole in the rim, metal installation guide plate, wheel sticker kit & a detailed step by step installation poster.
What are the main BENIFITS of TUbliss?
INCREDIBLE TRACTION: Instantly increase in traction! TUbliss allows you to safely run much lower tire pressures and dropping the pressure increases the contact patch, instantly increasing traction. The stiffer the tires sidewall the lower pressure you can run – this opens up a whole new level of traction and performance.
A PLUSHER RIDE: We all know the harshness that comes when we have to run higher tire pressures, well it gets that much PLUSHER as you drop below the average 12psi mark – Running lower tire pressures dramatically lessens deflection (also known as the “Ping Pong” effect) and allows your tires to deal absorb the small stuff before it ever gets to your suspension.
NO PINCH FLATS: No tube, means no pinch flats – this allows you to safely run lower tire pressures without risk of the dreaded pinch flat.
QUICKER TIRE REPAIRS: No tubes, so now you can now plug tires in seconds with tubeless tire plugs (no need to remove the wheel).In the event of a large gash or other severe tire damage the full circumference rim lock aspect allows for lower speed run flat capabilities. Mention tire sealant aspect?
MORE RIM PROTECTION: Get 100psi protection against rim damage & it helps to stabilize the tire closer to the rim allowing the sidewall to help absorb more of the impact before it gets to the rim.
WEIGHT SAVINGS: The typical weight savings on a rear wheel compared to standard pinch prone tube is about one pound and can be several pounds lighter than HD, or UHD tubes. And saving weight in the wheels is the most important place to shave weight. It’s a difference you can feel as it helps improve acceleration, braking & handling. Experts say saving a pound of rotating weight in the wheels is equivalent to saving 6-10 pounds of weight off the bike.
EASIER TIRE CHANGES: TUbliss utilizes a different installation method and after the initial installation. Future tire changes are much easier because you no longer have fight with the knuckle busting inner tube.
MORE VALUE: When maintained properly TUbliss can outlast the bike. Obviously this is much cheaper then tubes in the long run. Even in the event you have a slip up and damage a TUbliss, it is completely rebuildable and all parts are available separately for an easy fix.
What SIZES are available?
Please note that the size is determined by the rim, NOT the tire.
- 18” Tubliss for 18” x (1.85”-2.15”) rims
- 19” Tubliss for 19” x (1.85”-2.15”) rims
- 21” Tubliss for 21” x 1.60 rims
Is it hard to change tires with TUbliss?
Changing tires with TUbliss utilizes a different method than most are familiar with. But it is not difficult, watch the online video to see how it is done. And then just follow the step by step printed instructions & everything will go smooth. Most say after they have changed a coulple of tires it is actually easier than changed tires with standard tubes.
What do they weigh?
- 18” INCLUDING rim lock = 1lb.13oz. (approximately 1 pound lighter than a standard tube & rim lock and up to several pounds lighter the UHD tubes)
- 19” INCLUDING rim lock = 1lb.14oz. (approximately 1 pound lighter than a standard tube & rim lock and up to several pounds lighter the UHD tubes)
- 21” INCLUDING rim lock = 1lb.12oz. (this is about the same as a standard tube & rim lock and up to several pounds lighter the UHD tubes)
How LONG can TUBLISS LAST?
TUbliss last a very long time (maybe too long), assuming they are not damaged by accident, can last 10 times longer than tubes, or in many cases longer than the bike.
What TIRE PRESSURE do I run in my tire?
The ideal pressure for you and your bike depends on many factors. However you do not need to worry about pinch flats, this is the most common risk with lower tire pressures. But now you can tune the tire pressure similar to suspension. Still the biggest variable is the tire construction. The stiffer the sidewalls the lower the pressure you can run for more traction and a plusher ride. You can compare tires sidewall strength by doing the “TIRE SIDEWALL TEST” or stepping on the tires sidewall with your toe –“Tire Sidewall Test” below. But in general we suggest starting off with 2psi less than you would run with traditional inner tubes and then drop the pressure or “TUNE” it to the optimum pressure much in the same way you use the clickers on your suspension. Keep dropping the pressure 1psi at a time until performance drops off (then go back up 1-2 psi).
(7“B” – per the question above) What is the “tire sidewall test” ?
Ideally you can do this at your local bike shop that has several tires to compare. Stand a tire upright with the tread on the ground and step on the bead with your toe. You will see that different tires sidewalls flex differently, this will help you determine which tires have stiffer sidewalls. Of course the system works with all tires but you can run lower tire pressures in stiffer sidewall tires for maximum traction and a plusher ride.
What if I get a PUNCTURE or damage to my tires?
In the event of a puncture or tire damge you can simply plug it in seconds with a standard tubeless tire plug kit (no need to remove the wheel from the bike). Or TUbliss will hold the tire in place on the rim and allow lower speed run flat ability.
Can a TUbliss be punctured?
It is rubber and pneumatic, so yes it can be punctured. But the RED Liner is 3.5mm thick and the bladders is 2.2mm thick, so both are heavy duty and tough and this is very rare. If it is punctured you only need to replace the $9.95 inner bladder.
What if I have a DENTED or DINGED RIM?
Since TUbliss seals to the inside of the tire, the condition of the rim is almost irrelevant. However the INSIDE SURFACE of the tires bead does need to be in VERY GOOD conditions, as this is what the TUbliss seals to.
INSTALLATION AND TROUBLESHOOTING FAQ
What is the RIM TAPE for, or do?
The rim tape functions as a cushion for the tube against the spoke nipples and to keep dirt out of the rim.
Is it necessary to DRILL a new HOLE? HONDA
Yes, it is necessary to drill a hole. In many cases you can use the conventional rim lock hole by increasing the hole size from 8mm to 11mm. We do however recommend using (when available) the hole that is 4 spokes away from the valve. Should you have the setup with the holes opposite each other, we recommend drilling the new hole 4 spokes away from the valve hole as this makes for an easier installation and reduces the stress on the TUbliss system during installation.
What do I do if there are BUBBLES coming out around the high pressure valve?
This is normal once you have pumped everything up as as this should be the residual air that is trapped in the system. Should the bubbles continue after 5 mins, then this could be an indication that the system is not sealing properly. After inflating the system for the first time you should wait about 10mins. Should the bubbles continue after the 10min period, then remove all the air and use more soapy water between the tire and rim, making sure to get the soapy water all the way into the centre of the tire. Re-inflate the system and the tire and there should no longer be any bubbles. ???
Can I use a TIRE MOUNTING MACHINE?
NO! We do not recommend using a tire mounting machine as this method of installation could damage the Tubliss system/rim lock.
What kind of soap do I need for the soapy water?
Normal dish-washing detergent.
Can I mount the system using only Armor all/ tire mounting paste/ silicone spray?
You can mount the system using these products, but they are to be used for the sole purpose of making the INSTALLATION easier and so that you do not have to use force. It remains ABSOLUTELY IMPORTANT that you use soapy water before pumping up the high pressure tube and the tire.
TIPS TRICKS AND UNTRUTHS FAQ
Why should I CHECK the PRESSURE on the high pressure valve before every ride?
It is important to check the pressure on the high pressure valve before every ride because the system depends on the pressure in order to seal. (perhaps you know the correct term for air escaping a tube while it stands for a while)
What do I do if there are bubbles continue to come out around the high pressure valve?
This is an indication that the system is not sealing properly. After inflating the system for the first time you should wait about 10mins, it is the residual air trapped in the system. Should the bubbles continue after the 10min period, then remove all the air and use more soapy water between the tire and rim, making sure to get the soapy water all the way into the centre of the tire. Re-inflate the system and the tire and there should no longer be any bubbles.
What do I do if my tire is leaking air?
If your tire has a hole and is leaking air, you can simply plug it from the outside using a tubeless tire repair system.
INFO
INSTALLATION TIPS BY THE STEP
STEP 1: FOLLOW THE INSTRUCTIONS
Regardless of whether you have changed thousands of tires, there is still only one correct way to install and change tires used with the TUbliss system. PLEASE read, watch and follow ALL of the instructions EVERY TIME! And do not hesitate to contact us should you have any questions. Note that it is important to use a NEW tire or one that has NOT been previously mounted with a rim lock: OEM and other standard rim locks leave impressions inside the tire bead, allowing air to leak because the TUbliss cannot seal against this damaged surface.
STEP 2: RIM PREP
It is VERY important to position the rim lock and valve stem 4 spokes apart, or you will damage the bladder during tire changes. Make sure to smooth any sharp edges on spoke nipples and around the outer lip of the rim. NOTE that the rim tape does NOT seal in any way; it only acts as a cushion between the spoke nipples and the bladder. It is important to understand that the SEAL is formed between the bead of the RED liner and the INSIDE of the tire’s bead. The drop-center of the rim is NOT pressurized at all.
STEP 3: INNER-BLADDER ALIGNMENT
Thoroughly coat the RED liner and bladder with an “Armor All” type of product. This will help the TUbliss slip onto the rim much easier. Soapy water will also work, but you need to work quickly before it starts to dry and become tacky.
STEP 4: TUBLISS ON RIM
At this time ONLY finger-tighten the nut on the rim lock until the “BLACK RUBBER TRIANGLE DEFLECTOR” presses against the inside of the rim. Only minimal effort should be needed to get the TUbliss onto the rim — if it is not going on easily, STOP! Make sure the RED liner is pinched and fully seated in the drop-center of the rim opposite to where you are prying from.
STEP 5: RIM INSIDE OF TIRE
KEEP CONSTANT DOWN-FORCE ON THE RIM while prying the tire open with small bites. If you release the down-force, the rim will instantly jump out of the tire & you will have to start over.
STEP 6: TIRE MOUNTING
TAKING THE SMALLEST BITES POSSIBLE is really the fastest way! And the more you keep the bead pressed into the drop-center of the rim opposite your tire spoon, the easier it will pry on! This REALLY makes tire mounting much easier!
STEP 7: LUBRICATE, INFLATE & TORQUE RIM LOCK
This is a CRITICAL step, so TAKE YOUR TIME! You need to coat the outside of the RED liner with soapy water AFTER it is inside the tire. NOTE: tire paste will NOT work for this step; you MUST USE A LIQUID! Set the torque ONLY ONCE! Do NOT “RE-TORQUE” after it has been initially set, as it will be too tight and will cause damage.
TIRE REMOVAL
BE CAREFUL NOT to grab the TUbliss with the tire spoons, or you will damage it. And always inspect the RED liner’s bead for damage after the tire is removed.
TUBLISS REMOVAL
Only MINIMAL effort is needed to remove the system from the rim — follow the instructions exactly! If you are forcing it, you are doing it incorrectly.
MAINTENANCE
Check pressure before every ride.
Check pressure before every ride. The BLADDER will lose air pressure through natural permeation (when the air molecules seep through the membrane), at approximately ½ to 1 psi per day, due to the LOW volume / HIGH pressure nature of their design.
Inspect the sealing bead on the RED liner.
Inspect the sealing bead on the RED liner for damage before each tire installation.
Replace the inner bladder every 100 hrs or 12 months — whichever comes first.
Replace the inner bladder every 100 hrs or 12 months — whichever comes first.
Deflate the HIGH pressure tube when adjusting spokes.
Deflate the HIGH pressure tube when adjusting spokes.
When installed and maintained properly, the TUbliss system can outlast the bike.
When installed and maintained properly, the TUbliss system can outlast the bike.
NUETECH WARRANTY
We hold customer satisfaction in the highest regard and do our best to address any and all concerns. PLEASE contact Nuetech directly with any questions or issues.
TIPS
TIPS FOR RIDING WITH TUBLISS
Make sure the liner is inflated to 100 psi before every ride.
It is important to make sure the liner is inflated to 100 psi before every ride. The TUbliss system may hold the tire pressure with less, but for the best rim protection, 100 psi must be maintained.
Check your tire PSI often.
When installed correctly, TIRES will lose very little pressure over time; however, the TUbliss inner-bladder will still lose approximately 1 psi per day due to natural permeation (air molecules leaking through the bladder’s membrane). Also note that due to its LOW volume / HIGH pressure design, the inner bladder will lose several psi each time you check the pressure with a gauge. Also note that temperatures can affect tire pressures by several pounds.
Reduce pressure 1psi at a time until you reach optimum pressures.
Recommended tire pressures can vary GREATLY depending on the TIRES; as a general rule, the stiffer the tire, the lower the pressure you can run. As a general rule, TUbliss will allow you to run at least 2 psi less than with standard inner tubes. From this starting point, you can reduce pressure 1 psi at a time until you reach optimum pressures.
We recommend using a TUBELESS TIRE SEALANT in the TIRE only.
If tire punctures are a concern, we recommend using a TUBELESS TIRE SEALANT in the TIRE only. These products are not necessary with the TUbliss system, but are excellent at sealing small punctures.
For larger punctures or cuts, use TUBELESS TIRE PLUGS
For larger punctures or cuts, TUBELESS TIRE PLUGS are a QUICK AND EASY FIX! Just BE CAREFUL not to let the insertion tools make contact with the RED liner when inserting plugs. Also note that most plugs ARE compatible with the tire sealants; the sealant simply acts as a lubricant for the plug when inserting and actually assists in the seal. If possible, practice installing the plugs at home on an old tire. You don’t want to be 50 miles away from the truck and find out you’re not very good at it.
GENERAL INFORMATION & TIPS
TUbliss is for OFF-ROAD USE ONLY and is NOT recommended for street use
TUbliss is for OFF-ROAD USE ONLY and is NOT recommended for street use. – USING THE CORRECT TIRE for your riding is VERY IMPORTANT! For extremely rocky conditions (especially at high speed), make sure to use a tough 6 ply, desert-type tire to reduce the risk of cutting and punctures.
NEVER USE A TIRE MACHINE
NEVER USE A TIRE MACHINE with TUbliss! It WILL damage the TUbliss system.
Always use NEW tires or tires that have NEVER been previously mounted
Always use NEW tires or tires that have NEVER been previously mounted with STANDARD rim locks: OEM and other standard rim locks leave impressions inside the tire bead that will cause air leaks because the TUbliss cannot seal against this damaged surface.
TUbliss seals to the INSIDE of the TIRE’S bead
TUbliss seals to the INSIDE of the TIRE’S bead (not to the rim), so it WILL work with dinged or tweaked rims.
Pre-warming tires and TUbliss will make the installation easier
Pre-warming tires and TUbliss will make the installation easier — if possible, lay both in the sun or allow them to warm up in a heated room before mounting. ALSO use plenty of lubricant on the tire & TUbliss, we prefer to use an Armor-All type tire dressing.
Most new knobby tires are out of balance and are marked with a white or yellow dot or circle on the sidewall
BALANCE: Most new knobby tires are out of balance and are marked with a white or yellow dot or circle on the sidewall; this mark is generally the LIGHT SPOT of the tire and should be aligned with the rim lock for best balance. For high speed riding, it is important to have the wheel balanced for best results.
MAKE SURE your tire spoons do NOT have any sharp edges.
MAKE SURE your tire spoons do NOT have any sharp edges. When applying force on the lever during installation, sharp edges will cut and damage the casing cords of the RED Liner’s bead, causing the TUbliss system to fail.
Always follow the bike and tire manufacturer’s recommendations.
Always follow the bike and tire manufacturer’s recommendations.
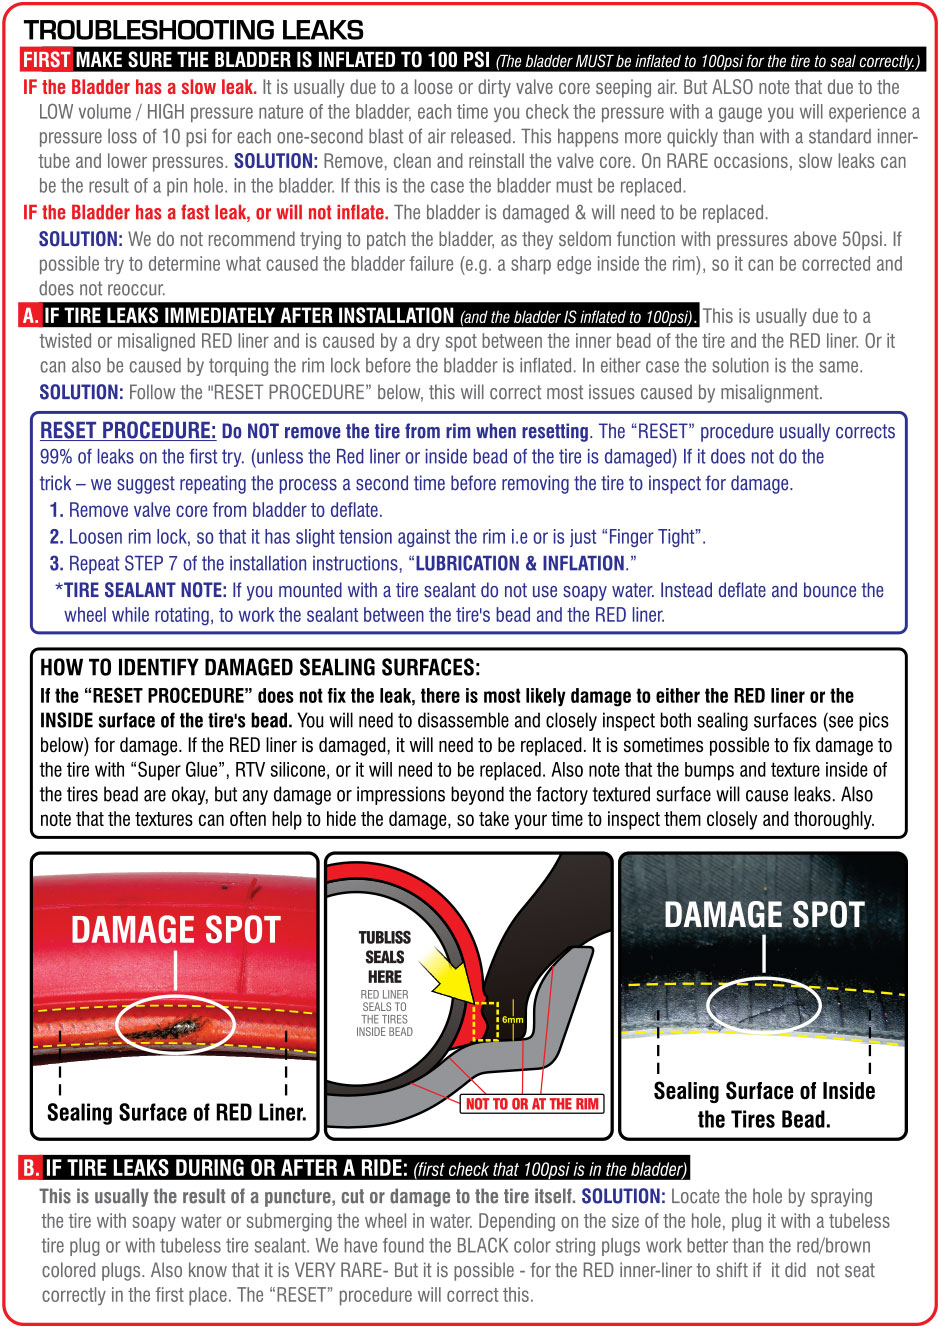
TROUBLESHOOTING LEAKS
How to troubleshoot leaks in your Tubliss Installation